Wednesday, December 21, 2011

Reuters Best Photos of 2011

0 comments

The boys at Reuters risk life and death covering groundbreaking news around the world. These are their best works for the year of 2011, and the images show just why Reuters photojournalists deserve their stellar reputation. Click on the following link to view...

Reuters Best Photos of 2011

Tuesday, December 20, 2011

New Year Resolution

0 comments

Well we've come to the end of the year again, and every new year brings forth new hopes and aspirations. If you feel that you've not done much this year, do not despair... just make sure that you plan well for the following year!

Many times, we may feel bored with photography and start to entertain the idea of buying more equipment to satisfy our insatiable craving for the terrible gear acquisition syndrome (GAS). Instead, why not direct your energy and budget towards books and education? Reading the right books can help advance your techniques and abilities much further than getting another (often unnecessary) piece of equipment.

And of course, the new year brings with it the opportunity to set new goals for yourself. I feel it's a great idea to set a monthly target for the new year, so every month you can look forward to learning or trying out new things in photography. For me, the goal could look like this...

January - Learn Adobe Lightroom
February - Try outdoor fill flash in daylight
March - Shoot portraits of people around me
April - Try time lapse photography
May - Learn how to isolate hair from background in Photoshop
June - Check out color management
July - Do up a photo essay on a favourite topic
August - Explore light painting techniques
September - Shoot with medium format film
October - Shoot studio still life
November - Experiment with photo compositing
December -  Consolidate works for the year into iPad portfolio

The goals could be simple, or perhaps stretch across a few months if its complex, but you set your own pace and interests. Print out a copy and stick it on your wall! And while you may not hit all the targets, it provides a structure and starting place to get you motivated to try something new every month. At the end of the year, you can look back and have a nice little portfolio to chart your improvement through the year.

Get started on your new year photographic resolution today, and feel free to share yours here!

Monday, September 19, 2011

0 comments

Kingdom of Ceylon
By Nelson Tan

Ok, I finally did it! I've created my very first photo book on Blurb, with my photos taken in Sri Lanka. Go check it out, and if you like it you can order a copy for yourself! Feel free to leave some comments too.

Tuesday, August 30, 2011

0 comments


Two great Photoshop tips you probably didn't know!

1) A JPG setting of 6 gives best balance between quality and file size
2) A JPG at setting of 10 gives best quality (11 & 12 creates larger files w/o better quality!)

Read the full write-up here.

Monday, August 22, 2011

Canon EF 8-15mm f/4L Fisheye USM review

0 comments

The Canon EF 8-15mm f/4L Fisheye USM is an interesting proposition on paper, being the world’s first fisheye zoom lens offering both circular and full frame images. But does it actually deliver the kind of performance that one expects from the superlative L-lens series?

Check out my review of this outrageously wide lens here!

Wednesday, June 15, 2011

Street photography: crop or crap?

1 comments


Lust. Gluttony. Greed. Sloth. Wrath. Envy. Pride.

The last time I checked, cropping is not included in the list of the seven deadly sins. So why do photographers have this compulsive aversion to cropping their photos? Some say that shooting loosely and cropping in post-processing are signs of sloppy technique and a lack of discipline. And that cropping wastes precious real estate of film or digital pixels, degrading the quality of the final image.

I agree fully with the rationale to compose carefully prior to the exposure for certain types of photography, where the photographer has the luxury of time to compose before taking the shot. Landscape or portrait photography, or even commercial or still life photography all fall under such a category. There is little excuse for radically cropping the final image to achieve a new composition, other than to fit the print media size that may be different from the sensor aspect ratio. Or perhaps you really had a square or panoramic image in mind when shooting.

However, it seems to be mostly street photographers or journalists who oppose strongly to cropping their images. I suppose the fact that Henri Cartier Bresson – the most prominent figure in street photography – was a strong advocate of “no cropping” really helped to reinforce such a viewpoint. Photojournalists have resisted cropping for another reason – their editors and layout artists. Photojournalists compose the scene for a reason, and their composition might have included certain elements to tell the story. Editors and layout artists may crop the photo to suit the layout of the page, which frustrates the photographers greatly, and hence haphazard cropping of photojournalistic images may lead to misinterpretation of the original intent of the image, which is why cropping is taboo to some photojournalists.

Many street photographers however, embrace the practice of no cropping without a good argument. In street photography, the world is your stage, and it is an unrehearsed play. Things happen at random and you had hardly lifted the camera up and hit the shutter release, the moment has disappeared. The decisive moment, as Henri Cartier Bresson had aptly termed, is decidedly decisive.

Therein lies the problem of a no cropping policy. In the brief instant where you tried to capture the moment, the expression or action is more important than the composition. Miss the expression or action, and no amount of composition genius can make the photo a masterpiece. Composition can be tweaked in post-processing to improve the photo, so you capture the moment with the ideal composition.

It is a well-known fact that Henri Cartier Bresson, like many photographers, wait for something (or someone) to happen to the scene. In such instances where there is luxury of time to compose, he had the time to compose for the geometry of the composition, which he greatly loved. And I might add (in the risk of sounding sacrilegious), the great photographer himself was not immune to the lure of cropping, as his famous “Man jumping over puddle” image (a true example where the moment matters more than composition) has been proven to be cropped from a wider image (removing lamp posts and other distractions from the left side of the image.

While I am not arguing or lazy or careless framing and composition during exposure, the anally retentive attitude of some street photographers in their insistence not to crop the image seems illogical to me. A great moment happens in front of me, and I’m armed with a 35mm lens instead of a 50mm lens, but nonetheless I captured the image and it is great – except that the composition is too loose. Should I not crop my image? Obviously the wider image was not what I had in mind, but I did not have the luxury of time to change lens or move in closer. Is there something fundamentally wrong with cropping?

Some people say that cropping a photograph changes its meaning. That is true if someone else is cropping your image, but as photographers you infuse the image with meaning. So if you decide to crop your image to express the meaning better, then there should be no reservations about it. As photographers, you have already framed and cropped the world the moment you chose the lens and your viewpoint and composition. Cropping can reinforce your point of view in post-production; it does not change the fact that you had already wanted to impose your viewpoint from the point of exposure.

At the end of the day, I posit that cropping is not inherently detrimental for street photography. If you are cropping to improve the composition because circumstances made it impossible to compose well during exposure, I believe it would make for a better photo. Conversely if the cropping was due to laziness in composing your image when shooting, then it is just a lousy reason and unnecessary step to improve your images. Even so, the immorality can only be attributed to “sloth”, which means cropping is still not any of the seven deadly sins.

Copyright 2011 by Nelson Tan.
All Rights Reserved.
Visit www.nelsontan.com for more articles on photography!

Tuesday, May 3, 2011

Old Queenstown estate before demolition

0 comments
While photographers have flocked to cover the rallies, I decided that I'm enochlophobic and thus preferred to check out the old Queenstown estate before they demolished everything. Just to share some photos...
If you find the slideshow interesting, you can visit http://youtu.be/ds1i3DZ1D-Q?hd=1 to watch the High Definition version.

Monday, February 7, 2011

Olympus XZ-1 review

21 comments
The new Olympus XZ-1 features the brightest lens of any digital compact cameras. Is it truly the answer to photographers’ dream of a high performance compact? Read on to discover the real-life performance of the Olympus XZ-1!

A new hope

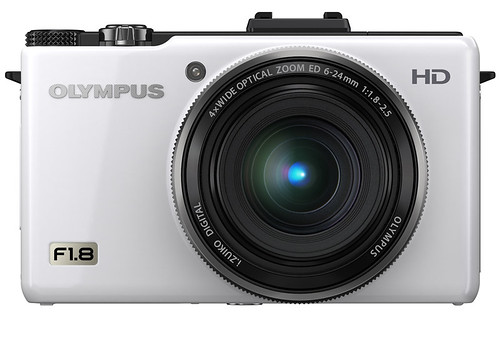
In January 2011, Olympus announced a new digital compact camera that threw the photography community into a little frenzy. The Olympus XZ-1 redefined a new era by incorporating an ultra-bright lens into a digital compact camera chassis and sensor. Up to now, photographers have been depending on their trusty compacts such as the Canon S95 and Panasonic LX-5, which have ruled the roost on top-end compact cameras with their bright lenses and slightly larger (compared to typical compacts). The new Olympus XZ-1 smashed the record with a 6-24mm f/1.8-2.5, which delivered ultra large maximum aperture of f/1.8 to f/2.5 with a 35mm equivalent of 28-112mm focal length!

The new Olympus seems promising on paper specs, giving photographers fast performance even with a compact camera. Olympus claims in its press release that the XZ-1 is “developed for the photographer or enthusiast who is looking for the ultimate high-quality, high-performance premium compact camera”, and that the camera is designed for fast speed and low-light performance. That sounds like a lot of promises they have to deliver on!

Specifications

Let’s start with the paper specifications. The Olympus XZ-1 has a relatively modest 10 MP sensor, which is in line with the trend of most high-end compacts today in reining in the megapixel race for better control of sensor noise. The Olympus is slightly larger than the Panasonic LX-5 and significantly more so than the Canon S95, which are its main competitors. However, it remains “pocketable” and is still much more manageable compared to the huge Canon G12 and Nikon P7000.


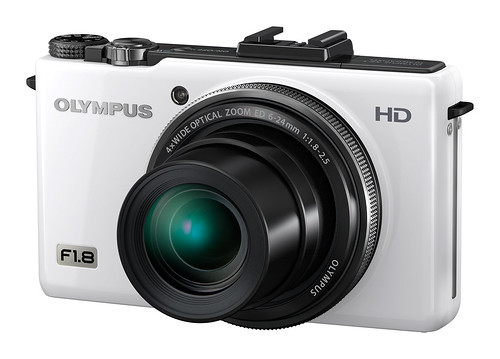
The most outstanding feature must be the iZuiko 6-24mm f/1.8-2.5 lens that the Olympus XZ-1 is endowed with. With a equivalent of 28-112mm focal length, the lens promises unmatched maximum aperture of f/1.8 at the wide end, and a stellar f/2.5 at the tele-end of the lens. Never before has such an impressive lens been found on a compact, which really worked the photographic community into a frenzy.

Shutter speed runs from 60 seconds to 1/2000th second, which is very good for a compact camera. The ISO range is very respectable from ISO 100 to 6400, easily the widest on any digital compact camera. The camera even comes with a built-in ND filter to help you harness the power of the bright max aperture in bright conditions.

Design and handling


For a digital compact camera, the Olympus XZ-1 handles with aplomb. It manages to fit in the pocket even with the huge lens, and the controls fall easily to hand. The body has a nice matte finish to it, but it feels a bit too smooth to offer a good grip. As  compensation there is a nice patch of rubber at the back of the camera for the right thumb to grip though.


Olympus has chosen not to include a charger with the camera, so you get a USB cable that you can connect to the camera to a power adapter for charging. This makes it impossible to charge a spare battery if you’re using the camera, although you can purchase an optional battery charger.

On the upside, you can connect the camera to your computer and download the images and charge the camera at the same time, albeit at a slower charging pace. I do have some concerns whether the flap covering the USB port on the camera will be worn out over time.

The Olympus XZ-1 uses a smallish LI-50B battery with 925mAh capacity, rated for 320 shots per charge. I managed 666 images (actually 333 simultaneous recording of both RAW+L) from one charge, which is pretty close to what Olympus claims.

The camera comes with a push-on lens cap, which must be secured by the lens string to avoid accidental loss. I’d very much prefer an integrated lens cap like other compacts, or at least a spring-loaded snap-on lens cap at least. In practical use however, the lens cap on the thread is not as fiddly as I imagined, and turning on the camera pops the lens cap out automatically, which is quite convenient! There is no filter screw thread on the lens though, so the use of screw-on filters is out of the question.

There is a tiny spring-loaded built-in flash that pops up with considerable force, and while it’s small in power (guide number of 7) it is pretty capable in illuminating nearby subjects with advanced flash controls, including fill-flash in fractions. The flash can even work with dedicated flash units for wireless flash triggering! There is a hot shoe on the camera, which you can mount external flash units for more power or to bounce the light.

The Olympus XZ-1 features a dedicated video button that falls nicely under the right thumb, so you can instantly switch from shooting stills to 720p HD video at 30 fps at the touch of a button. This feature is very convenient and useful, but unfortunately not programmable for people who don’t shoot video.

And finally, Olympus stuck a F1.8 sticker on the front of the camera. I understand that this is a major selling point of the XZ-1, but it is totally unnecessary to call attention to it with a huge “look at me!” sticker. Potential customers already know of this fact, and it sticks out like a sore thumb for photographers trying to be discreet with the all-black version.

Operation


With the Olympus XZ-1, the navigation menu is easy. There is virtually no need to look at the instruction manual for most of the operation, except for more complex actions such as setting wireless flash etc. Press the power button and the camera powers up and extends the lens almost instantaneously.


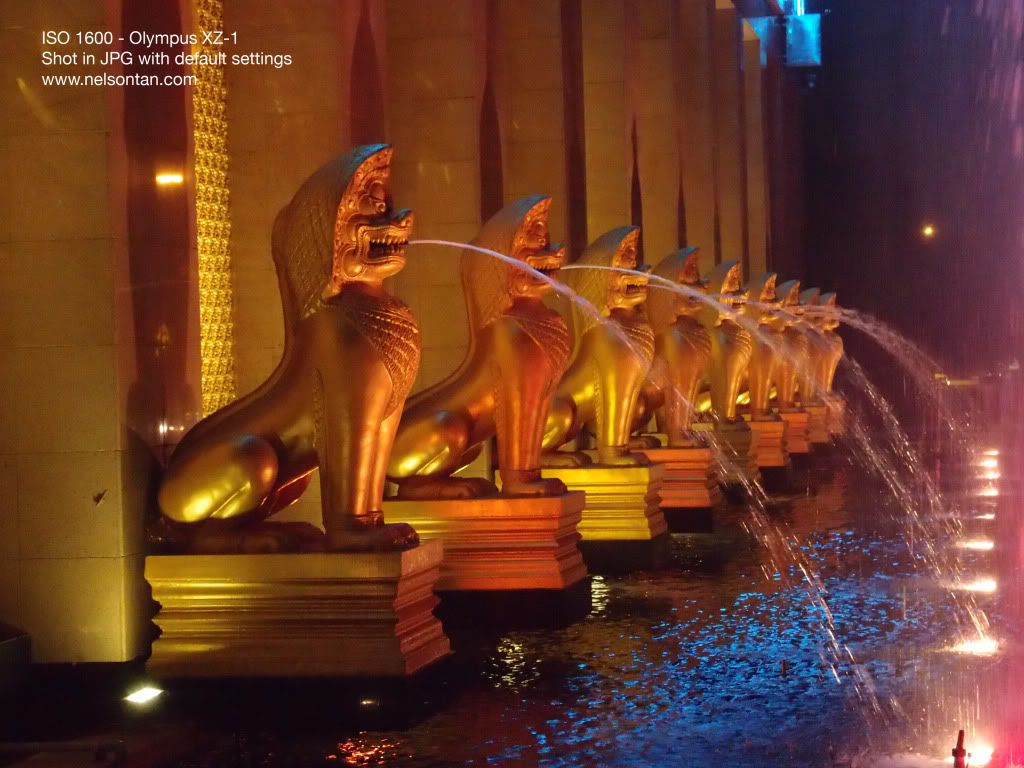
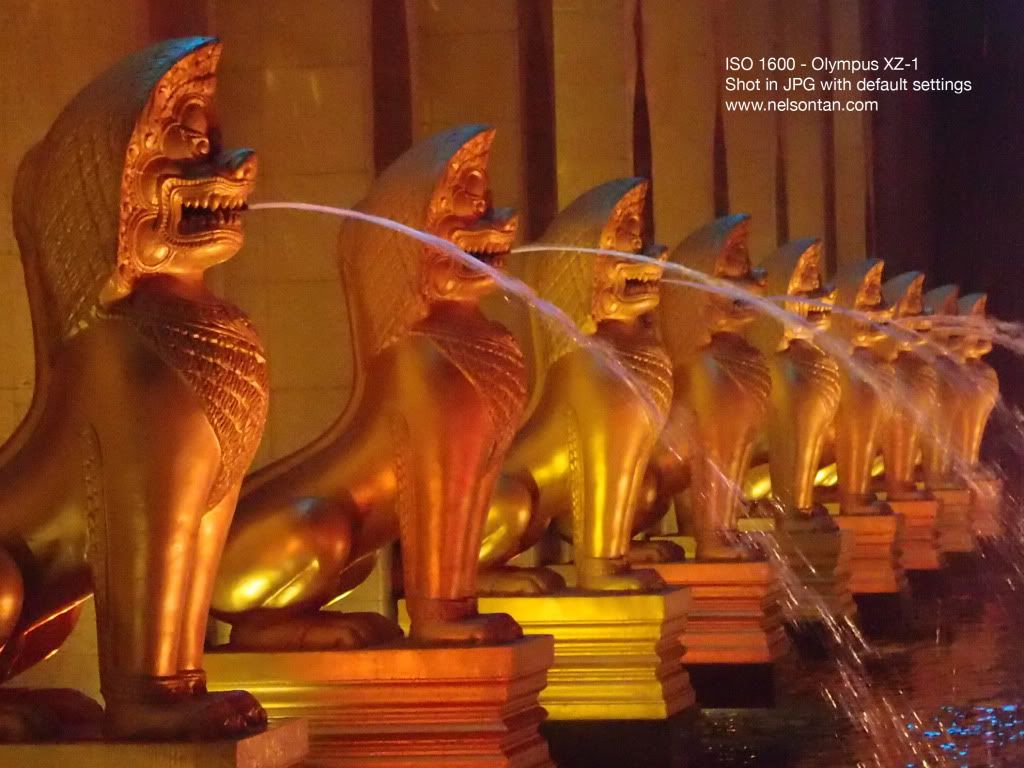
Amazing sharpness and control - when the light is good. Click on images to enlarge.

Zooming of the lens is done with the ring around the shutter release button, and the control is nice and smooth for precise zooming. The mode dial is located just beside the shutter release button, which turns confidently with nice clicks (but it does rotates by accident sometimes).  The modes are painted onto the dial, which makes me wonder if the paint will rub off over time (it will be a real issue if it does!).

The ring around the lens is nicely made, and the positive click stops makes it a pleasure to change the setting such as the aperture etc. I use my cameras in aperture priority mode most of the time, and the LCD displays the selected aperture in a scale format that is easy to use alongside with the lens ring selector.

In terms of focusing, the Olympus XZ-1 features the standard auto-focus, face detection, focus tracking, macro, super macro and manual focus. While the various focus modes work well, I disliked the fact that changing the focus mode is a two-step process (while many cameras do it in one step). In addition, I would love it if the camera can focus closer without me having to go into the close-up mode, which is a hassle due to the design.

Macro mode makes the car look faster than it really is. How brilliant!

One glaring design flaw of the Olympus XZ-1 is not having direct buttons for changing the ISO and Auto WB. Given that this camera is designed for serious photographers, not having ISO button is a serious drawback. We probably do not want the camera to set the ISO automatically, so we would need to change the ISO frequently to keep ISO to the lowest speed. It would be great if we can reprogram any of the buttons to let us change the ISO directly! The Auto WB works surprisingly well, but a lot of users would still love to have a WB button.

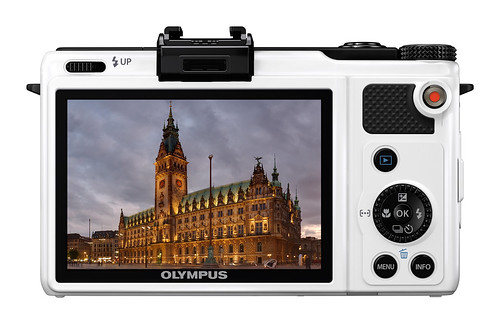
The 3” OLED monitor (610k resolution) with wide-viewing angle is bright and visible even in harsh sunlight, but can be difficult to use for certain operations such as manual focusing. You can however fit an optional Olympus VF-2 finder for easy viewing in all lighting condition, as well as achieving better critical focus.


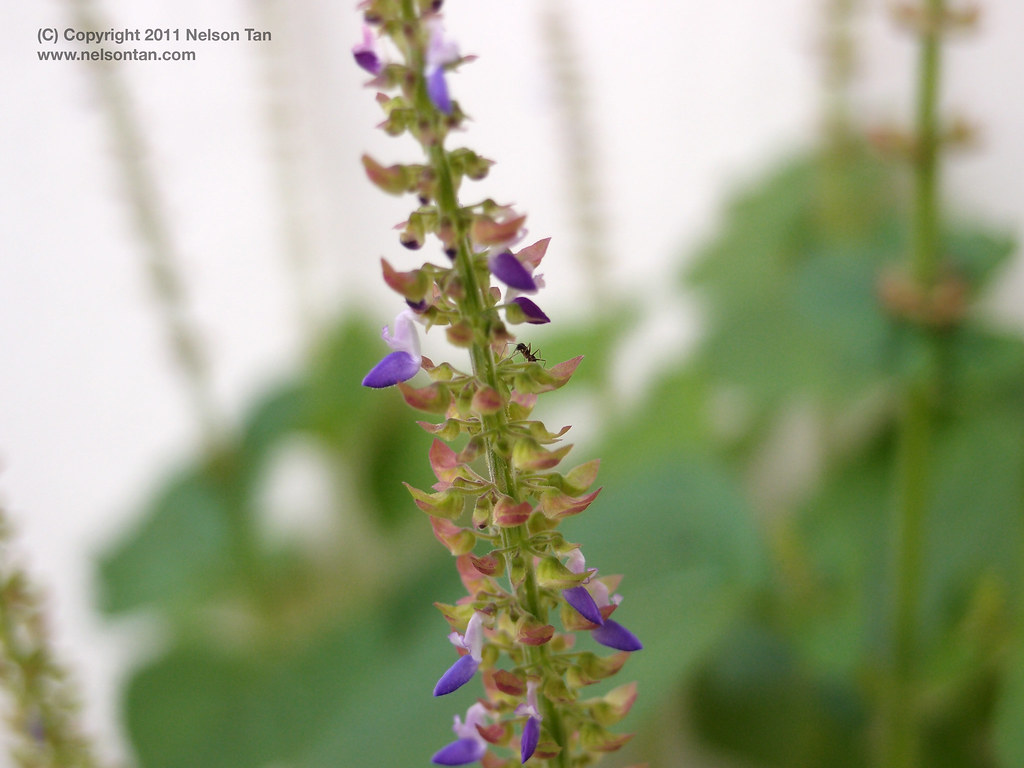
Impressive macro performance from the Olympus XZ-1. Click on images to enlarge.

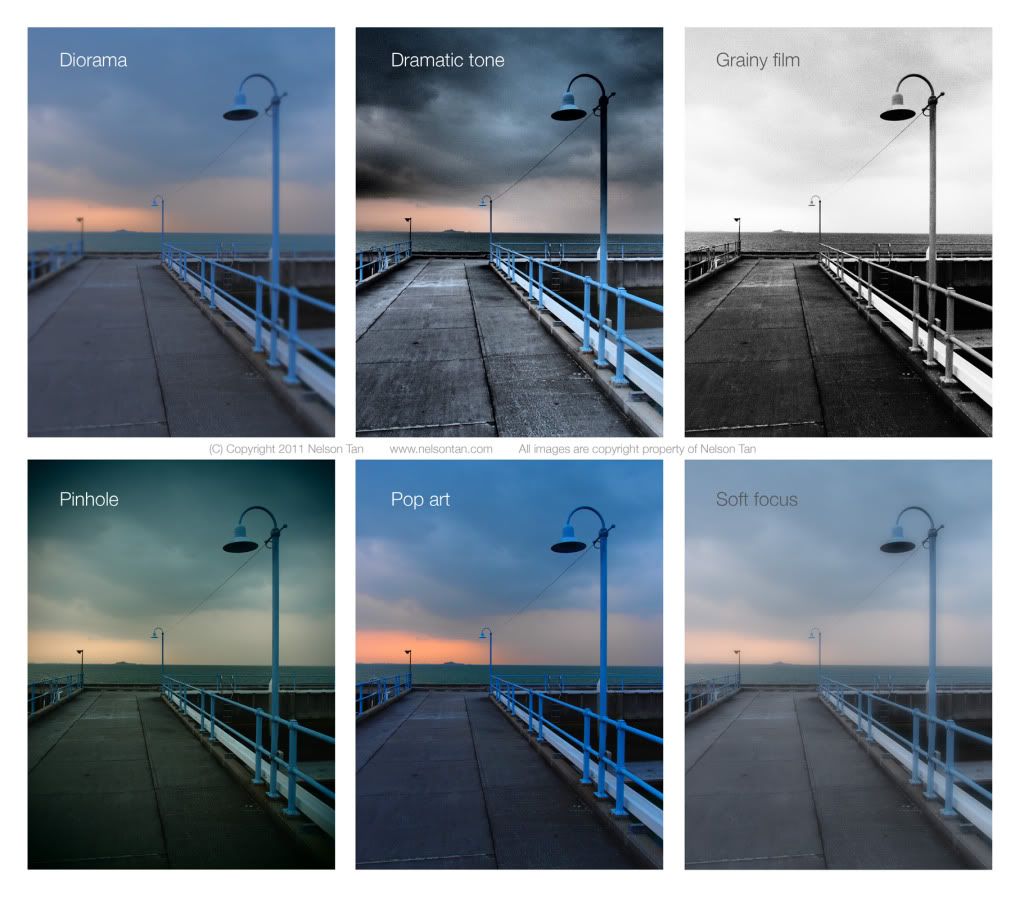
The Olympus XZ-1 comes with six Art Filters for photographic effects: Pop Art, Soft Focus, Grainy Film, Pin Hole, Diorama and Dramatic Tone. For serious photographers, these are nothing more than fancy modes that messes up the image. However, they can be quite fun to jazz up your image, and I like the fact that you can enable the effects in the RAW converter in the post-production stage if you are shooting in RAW mode.

Cool effects available, but don't get too addicted! Click on image to enlarge.

The diorama mode works well in certain images! Click on image to enlarge.


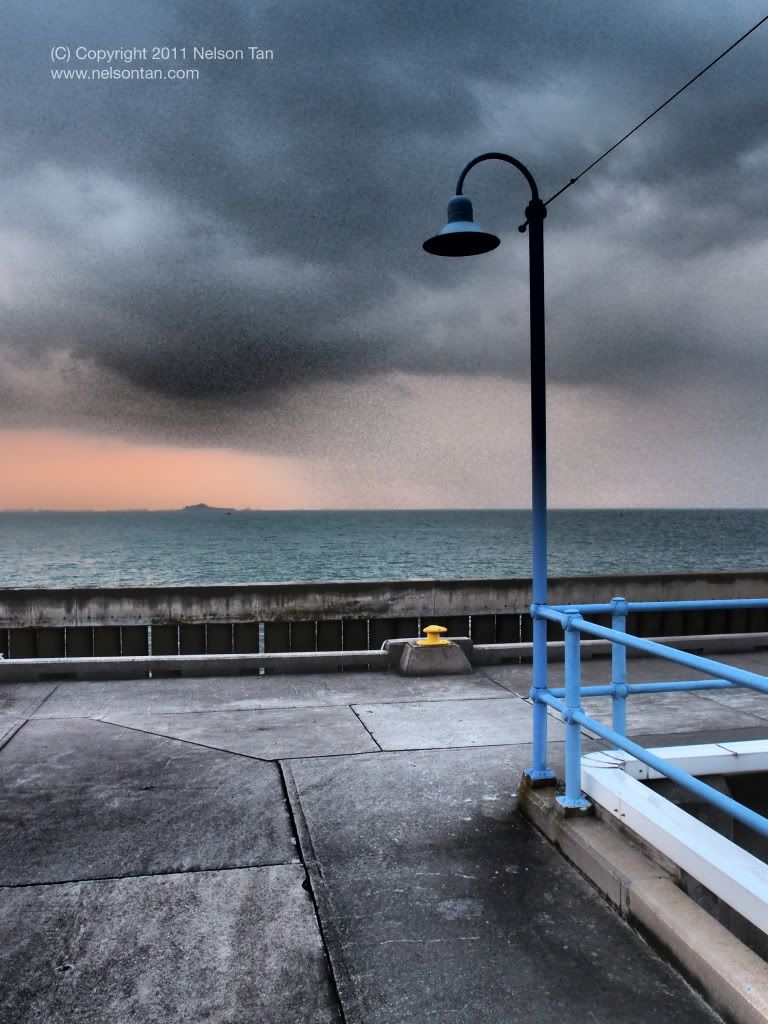
But the award of "Coolest Effect" still goes to Dramatic Tone. Click on image to enlarge.


Is the camera responsive enough?

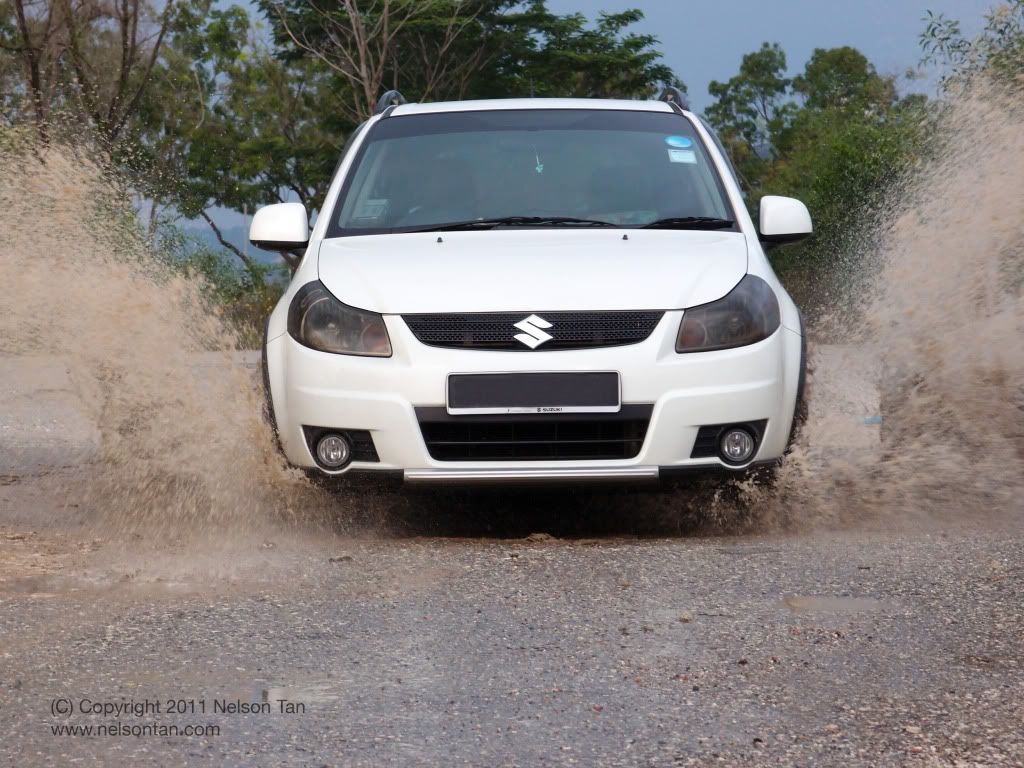
The image below was taken with the Olympus XZ-1 to demonstrate the short shutter lag. That was one of my concerns when purchasing the camera, and I had a short time with it at the store counter before deciding that it is pretty good in terms of shutter lag. However, this is assuming that you don't encounter difficulty in autofocusing, which will definitely have negative repercussions in capturing the image.

So far, the Olympus takes slightly longer to focus in lower light, but it is still mighty quick for a compact. In good light, it's really fast in focusing and the short shutter lag means that you never really miss most subject.

Just to clarify, this shot was taken to test the shutter lag only, not the autofocus tracking! I preset the focus point to the puddle of water and held the focus there by holding down the shutter release button at half-way position, and shot it as soon as the car's front tires hit the puddle. I was at the 112mm end of the lens to keep myself furthest away from the car in case I got hit!

Short shutter lag means you can get shots like this! Click on image to enlarge.

Results

The Olympus XZ-1 is quite a joy to use, with fast shooting speed and short shutter lag. The focusing is pretty quick and snappy for a compact camera, and the zoom controls are smooth and precise. In low light conditions, focusing slows down but hunting is not prevalent with this camera.

The iZuiko lens has a strong tendency to flare though, bleeding magenta cast in the overblown areas. Such situations do not occur frequently, but when they do it is difficult to shield the lens totally from flare.

The video performance is pretty impressive though with very smooth stabilization. Autofocus works in video mode, but don’t expect the focus to be fast enough to capture fast moving subjects or quick change in subject distances.

Image quality is a mixed bag. The Olympus XZ-1 performs exceptionally well in certain conditions, but absolutely falters in others. In terms of JPEG quality, the Olympus TruePic V image processor does a nasty job of smearing details with heavy-handed noise reduction for any images shot above ISO 400. Forget about shooting above ISO 800 unless you are a huge fan of watercolour rendition of your images, or simply love Kodak TMAX 3200’s grain or noise.

Wide open shots deliver relatively shallow depth of field. Click on image to enlarge.


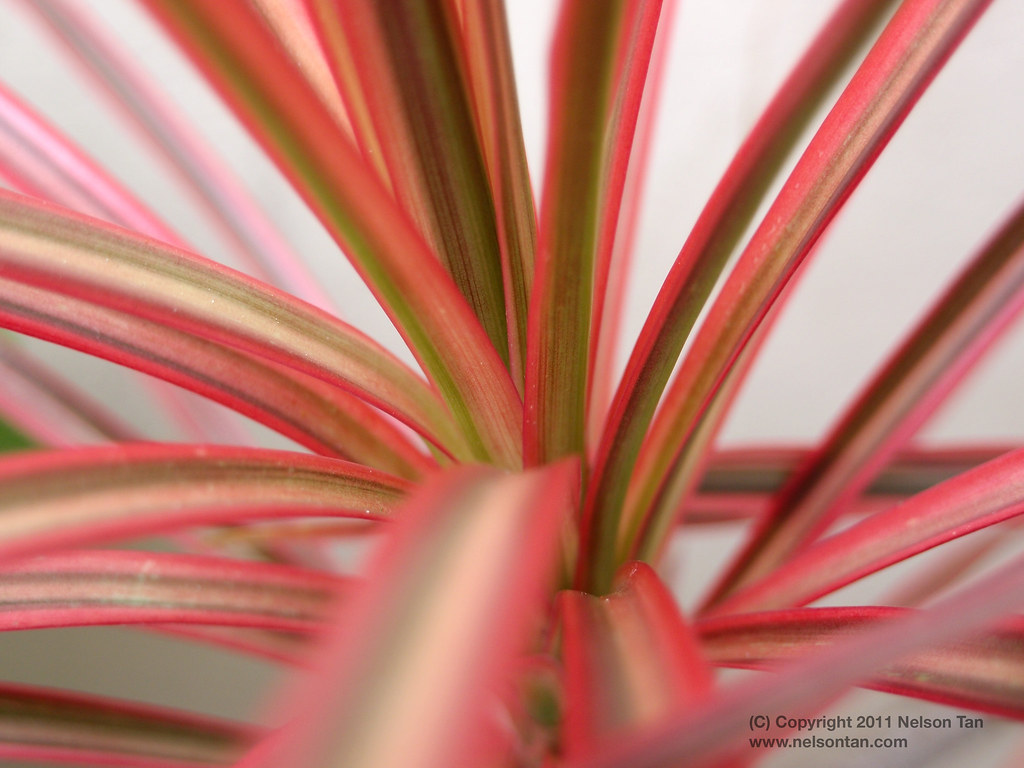
Generally impressive performance from Zuiko lens. Click on image to enlarge.

In good lighting and at low ISO settings however, the Olympus XZ-1 is an absolute peach with its iZuiko lens. The images are extremely crisp and sharp, showing off the impressive lens to perfection. The advantages of large aperture can be used to their maximum advantage, delivering relatively shallow depth of field that one does not typically associate with a digital compact camera. In good light, the camera tones down its ham-fisted noise reduction algorithm, and you can see the impressive resolution of the lens in fine details.

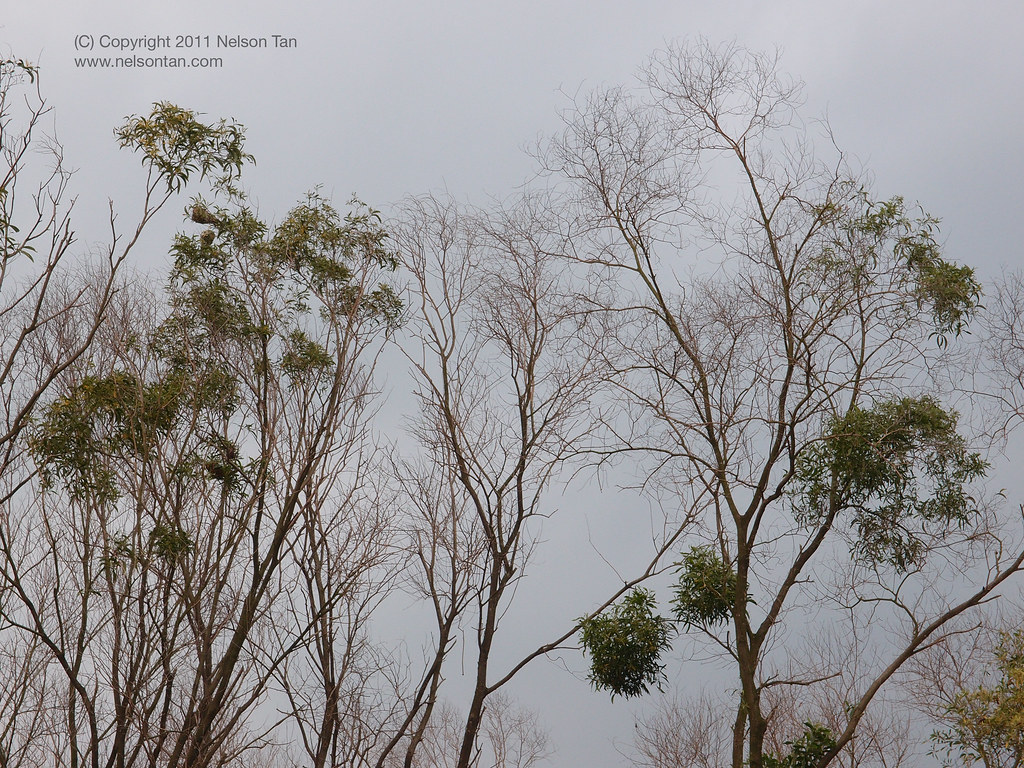
Strangely, the Olympus XZ-1 struggles with distant subjects. Regardless of lighting condition or ISO settings, finer details in distant subjects are smeared in general. It is not as if the camera is incapable of good resolution, as the macro photography can capture even minute details with impressive performance. The combination of aggressive noise reduction and high amount of sharpening (presumably to bring back details lost in the noise reduction) can introduce a very “digital” feel to some of the images (not in the good sense!).


Distant details suffer from aggressive noise reduction even at ISO 100.

Click to enlarge cropped section.

Depending on the image it is possible to tone down the smearing of details and noise reduction. Let me say that a lot of these issues become magnified in pixel peeping, and you probably will not see the effects when viewing the full image.

Strangely, the camera give hints of when the image is going to turn out slightly fuzzy with the noise reduction, even at ISO 100. When the light level falls, you can see some tiny "buzzing" rendition on the LCD screen when composing the image, which lets me know that noise-reduction is kicking in. It's weird, but so far it holds true for me - the images that I reviewed on the computer in post processing did look softer for the images with the "buzzing previews".


You can shoot in RAW mode to by-pass the aggressive noise reduction, but the problem of noise rears its ugly head once you turn off the processing. The bright Zuiko lens can’t help conceal the fact that the sensor is ultimately restricted by its small size compared to M4/3 sensors. The Olympus RAW software converter works pretty well and quickly, even though initially I was plagued with very slow responses when I was multi-tasking on my Macbook Pro.

Is the quality really that bad? No it isn't!

The Olympus XZ-1 is not known for being the sharpest digital compact in town, and we have seen many instances where the image has smudgy details to compensate for the sensor noise.

Worse case scenario (or even average performance) aside, what is the best that the Olympus XZ-1 can deliver when it comes to landscape details? Well... surprisingly acceptable if you are willing to coax out the image with the right settings. Here's an image I took of some branches and foliage, which is something that will trip most cameras over.

I shot the image at ISO 100 in RAW mode, in Aperture priority at f/5.6 and 1/60th sec. The RAW file was converted in the Olympus software with a +0.5 EV compensation to brighten up the details. Noise reduction was set to zero, and I dialed in +1 for sharpness in the Olympus software.

The resulting image is not something that will get the larger sensor cameras worried, but it shows that the Olympus XZ-1 can deliver reasonably good imagery with proper care and technique. Not quite the mushy leaves and branches I was dreading... phew!

Here’s the full image… Click on image to enlarge.
 
And here's a 100% crop from the image… Click on image to enlarge.

Not too shoddy for a compact! You can get good images with a bit of care and understanding of how the camera operates.

High ISO samples

Everyone is curious about how the Olympus XZ-1 performs at high ISO ratings, given Olympus marketing team’s enthusiastic pitch of the camera as a low-light camera. Well… I wouldn’t exactly call it a “low light camera” even though it carries a bright lens, because the aggressive noise reduction and noisy sensor really limits how much you can shoot in dim conditions.

I don’t think it is as terrible as I imagined it, and it really is quite acceptable for a compact camera with a small sensor. It’s certainly no match for the APS-C or M4/3 sensors, but you certainly can capture images that few (if any) compact cameras can, thanks to the brilliant Zuiko lens mounted on the Olympus XZ-1!

I took some images in JPG mode with default noise reduction and sharpening for you to judge the quality for yourself.

 
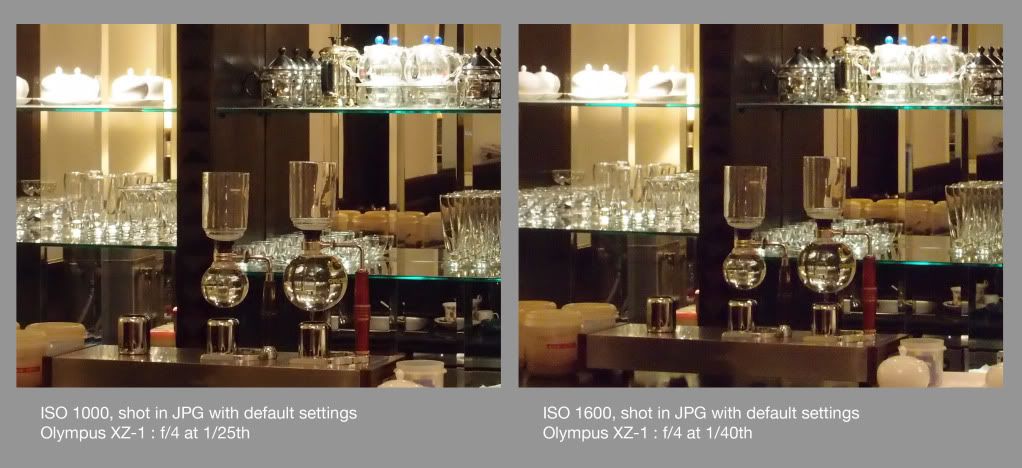
Enlarged section of image shot at ISO 1600. Click on image to enlarge.


ISO 1000 and 1600 compared. Click on image to enlarge.


ISO 100, 400, 800 and 1600 compared. Click on image to enlarge.


Conclusion

As Darth Vader will say, “The Force is with you, young Skywalker. But you’re not a Jedi yet!” In this case, I’d say that the Olympus XZ-1 carries an impressive lens, but the size and capabilities of the sensor means that it carries no threat to the bigger boys such as the Micro Four-Thirds or DSLR.

If you are looking for pure quality in a compact, you’d be better served by something with a larger sensor in a compact chassis such as the Leica X1, Fuji X100 or the Panasonic GF-2/Olympus E-P2 with pancake lens. I know they cost much more than the XZ-1, but you will be sorely disappointed if quality is your main criteria.
The Olympus hates the Dark Side. Slight blurring occurs as noise-reduction kicks in.
If you are comparing to the Panasonic LX-5 or Canon S95, the Olympus XZ-1 will be a good choice if lens specification is your key consideration. The Olympus delivers strong performance over the competitors in good light and moderate distance, but fails to shine in poorer light condition and closer to infinity. Both competitors offer credible lens performance and good max aperture as well as distinctive advantages, with the Canon S95 in a truly small chassis and the LX-5 delivering native 16:9 panoramic images. They are definitely no pushovers in this battle of digital compacts, and these three cameras cater to different crowds.

Perhaps the dream of a digital camera with great quality and bright lens in a compact chassis was too ambitious for current technology, which led me to be disappointed with the Olympus XZ-1’s image quality. The camera has it nailed in virtually all aspects, but the sensor is simply a let down for me. I’m sure many photographers will enjoy using the Olympus XZ-1, but I personally find it ironic that a camera that is designed to thrive in low-light with its bright lens delivers its worst images in such conditions (no fault of the lens – it’s the terrible noise reduction processing).


If only the Olympus can deliver images like these constantly...

Great image quality in a truly compact camera? Yes, the Olympus XZ-1 is a happy camper given sufficient light, and you will be amply rewarded with sharp images with great colours. But when the light level dips and the camera is given a free rein with its over-the-top noise reduction, everything just falls apart like a house of cards. It is not a camera for everyone, and should be used with care to get the most out of its noisy sensor and high-performance lens, and definitely not for low-light photography.

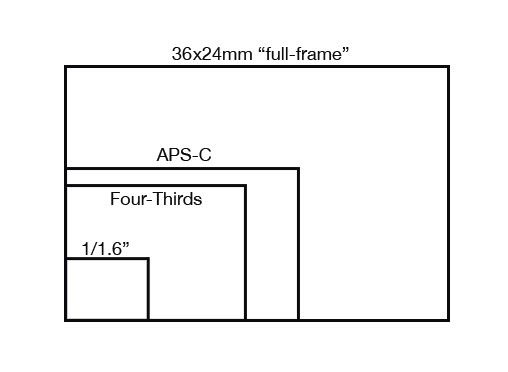
Let’s be realistic – the 1/1.6" sensor is too small for truly noise free photography

The compactness lets me carry the camera everywhere, and get images where I used to miss because I did not have a camera with me. I'd say that the Olympus XZ-1 is an excellent camera in spite of its limitations, or when you compare it with other offerings in the same league (such as the S95 or LX5). It's not an easy camera to handle if you expect quality images straight out, but given time to learn its quirks, I think most users will grow to love it more.

Anyway, this is a compact camera so I get to carry it everywhere, and having noisy images is better than having no images. My review was never meant to compare the XZ-1 to a larger sensor camera, but rather to provide some actual images from the camera to curb high expectations stemming from the enthusiastic marketing from Olympus pitching the XZ-1 as a low-light camera.

If you happen to own the Olympus XZ-1, bring it everywhere whenever you leave your larger cameras at home. Cheers!


Keep yourself in the loop...

If you want to be updated on my latest reviews and photography articles, click on the following link to join my blog's Facebook page!

"Photography Happenings" Facebook page

Friday, February 4, 2011

Travel photography - better pictures from every trip!

1 comments


Travel photography is a perennial favourite among many photographers. The promise of seeing the world and its multi-faceted subjects is reason enough for shutterbugs to ditch the comfort of their homes to travel forth and bring back exotic images. So why is it that many of us cringe when asked to sit through a slide show of a friend’s latest travel adventures?

We all had bad experiences of being compelled to view bad travel photography while giving courteous smiles and nods of our heads. Bad photos? Boring images? Probably all that and more! We may not be National Geographic photographers, but certainly we can be all capable of capturing better travel photography with some simple tips!

Equipment

Less is more - it can be tiring to bring too much equipment on your trips. The ability to lug heavy loads vary from photographer to photographer, but in general the advice to bring less gear to reduce fatigue holds true. Avoid bringing gear that you think you might use, and distill down to your essential equipment only. If you are still unsure if you can carry the load, simply pack your bags and head out for a day of shooting to see if you are comfortable with the weight. Whatever seems light at home will probably double in weight in the field!

Plan according to your destination. Research pays off when planning for your gear. If online sources and guide books tell you to expect great landscapes and scenics, you might like to bring along wide-angle lenses and ditch that super long telephoto at home. Or if you know that the destination is a tropical rainforest, pack more waterproof bags and bring along flash equipment to deal with the low lighting levels in the undergrowth. Research helps you bring the right gear and reduce unnecessary weight.

Bring more batteries and cards. It is a terrible feeling to restrict your shooting just because you are low on power or storage capacity. If you have friends using the same batteries, loan the batteries from them before the trip (you can return the favour in future when they go on their travels).  Memory cards are pretty affordable now – get a couple more cards than you might need. There are a lot of things that can go wrong with memory cards, so pack some spares.


Download to a hard disk/notebook if possible. It helps to download your images daily to free up your memory cards, or to act as a backup storage. Although it adds on to the weight, I like to have a notebook computer with me to download and view the images every night, as it is useful to check the images to spot any potential problems with the gear along the trip, rather than discovering the problem when you return after a 14-day trip from a exotic place!

Zoom lenses or primes? My personal preference goes towards zoom lenses for their versatility – I can capture photo opportunities faster and better with a range of focal lengths in a zoom. Prime lenses offer the largest maximum aperture, but I am willing to trade a smaller maximum aperture to capture photo opportunities more fluidly with a zoom lens.

Bring spare equipment if you are really serious about your photography. I usually pack a spare body and lens, kept in the hotel safe deposit, in case my camera or lens conks out on me during the trip. You can also substitute with a compact camera – something is better than nothing.

DSLR, Micro Four-Third or compact camera? Both DSLR and Micro Four-Third cameras can capture great images, although the DSLR still has an edge on image quality by virtue of its larger sensor. With a good range of lenses and fast focusing speed and short shutter lag, I do not have qualms bringing either of them for a trip. Compact cameras in general have small sensors, slower focusing and suffer from shutter lag. While they are suitable for certain situations, I will still avoid using a compact camera as the sole camera for a trip.

What’s in my camera bag

Unless the trip has special requirements (like a safari trip), I usually pack the following focal lengths to deal with general situations. I use full frame DSLRs, so if you are using APS-sensor cameras, you may need to vary your own focal length to adjust for the different sensor size.

- DSLR mounted with mid-range zoom (24-105mm) for general street scenes
- Tele-photo zoom (70-200mm) for distant action
- Spare batteries and memory cards


I like to travel very light, and that is my preferred combination, but your own mileage may vary so choose whatever works for you. I prefer to use f/4 zoom lenses instead of the heavier f/2.8 variants, and I will leave spare equipment in the hotel safe deposit unless I know I need them for the day. So what’s left behind in the hotel?

- Spare DSLR body
- Ultra wide-angle zoom (16-35mm) for landscape/interior
- Fisheye lens
- Flash
- Tripod

I try to keep my bag light and empty, in case I spot something I’d like to buy along the way as a souvenir. And I usually bring my passport along with me in case of emergencies, and for tax rebate purposes for purchases in some countries like Japan.

Packing

NEVER check in your camera/lenses. Luggage handlers are known to be really rough with your bags, and there is a chance your luggage may not arrive with you. Always carry on your gear, especially cameras, lenses and flash. You may check in your non-critical accessories (excluding memory cards and batteries – you need them!) in your luggage if you can’t carry on everything.

Keep your equipment with you at all times. Some countries are more risky when it comes to your personal belongings, so always keep an eye out for your gear. Keep your bag in sight literally, and never leave it hanging off the chair behind you or at your feet. Loop the bag strap around your feet or the chair for added security.


Pack for the country you’re traveling. Be aware of the climatic conditions and prepare your gear accordingly. Sand, dust and water are your gears’ greatest enemies – so be sure to keep your equipment safe from the elements.

Bring power adapters and spare cables. Don’t assume that your hotel or accommodation will have the necessary adaptors or cables. Bring your own adaptors and cables – or even better, bring spares! Your gear is useless without power.

Health concerns, risks and medication. Check out the health risks at the destination before you fly. Check with your family doctor to see if you should be even traveling to the country. You might have to take malaria pills or high-altitude pills for certain places, so prepare your medication at least a month before hand.

Do you need visas and permits? Always check carefully if you need visas and permits to enter the country, and leave enough time for the embassies or authorities to approve the papers. Also be aware of the restrictions of the visa or permits, such as the scope of travel or the duration of the tour.

Lighting


Beautiful lighting is unusual lighting. The most photogenic lighting takes place in the early or late hours of the day, or in the most unlikely places. It is a classic scenario where less is more – beautiful lighting occurs less frequently and in lesser amount.  So wake up early to catch the first light, and stay around longer when others have packed (assuming it’s safe to do so!).

Never stop observing or shooting – take note of the lighting conditions and see the results on your images. Analyze what makes the lighting work, and the conditions for it to happen. It may be a burst of sunlight streaming through the leaves, or a ray of sunlight reflecting off a window. A famous photographer once said that there is no right subject, it’s just finding the perfect lighting.

Editing

Editing your sequence is an important skill, but it has been delegated way below Photoshop editing skills unfortunately! Travel photography involves telling a story about the place using a series of photos, and being able to edit your sequence can make or break your travel photos.

Be critical of what you show others. Editing involves the selection of the right images, the right quantity and the right order. Toss out the technically bad and meaningless photos, followed by the mediocre images and so on. Learn to edit your images ruthlessly, and do not let your emotions during the moment of photo taking affect your judgement. Even if you have spent much effort capturing the shot, if it does not look good or fit into the story, out it goes. Find a good photographer friend to help you toss out images if you are unable to remain neutral.


Arrange the images in a sequence that tells a story. You can arrange by chronological order or by your trip itinerary, but it should be flow well as a story. Imagine yourself giving a narrative for the slideshow – does it flow well or does it sound like a jumbled up story?

Keep your story short but compelling. It is better to leave the audience hankering for more, rather than wishing the slideshow to end sooner. Audiences have short attention spans, so any slideshow sequence longer than five minutes is really stretching it! I personally like to keep it under five minutes, with less than fifty images in total lasting five seconds or less each on the screen.

Use music to accompany your slideshow to liven up the presentation – it can be remarkably awkward viewing images in silence, especially if you have nothing interesting to narrate about your images along the way. Choose a piece that fits the mood and theme of your slideshow. I like using iPhoto on a Mac to do up my slideshows, and you can find your own favourite software to do the same.

The sense of place

What makes this place unique from the rest? That should be the question that your images aim to answer. Good travel photography provides the viewer with a sense of place, telling them the unique characteristics about the place and its people. But how do you capture the sense of place?

Include wide-angles, mid-shots and close-ups. A National Geographic photographer once gave this useful tip in taking photos that capture the sense of place. Too often photographers are comfortable with shooting in one style that all images during the trip look the same. You end up with too many wide-angle shots or people shots, so the slideshow fail to tell the complete story of the place. Learn to vary your images with wide-angle scenic shots, mid-shots of people and close-ups of their artifacts.


Capture the PLACE - People, Landscape, Activities, Culture and Environment. A slideshow that reflects only a couple of aspects of the place can be extremely tedious to watch. Make sure that you photograph the various components of PLACE to deliver a well-rounded presentation of your travel destination.

Don’t be shy in approaching people - you have greater “allowance” as a tourist. Most of the locals will be more open and tolerant of your photography because you are a tourist, so be nice to them and there is a high likelihood that you will be permitted to photograph them. But be sure to respect the culture! Some cultures do not take well to certain photography, so read up ahead before shooting.

If you are interested in learning more about the sense of place, I highly recommend reading “The spirit of place” by Bob Krist. It’s a wonderful book by the renowned travel photographer on capturing the gist of your travel destination in your photos.

Conclusion


Travel photography is fun, and you need not travel to exotic destinations to achieve great results. Keep your eyes open for various opportunity to photograph subjects, open your mouth to ask trusted locals (or even the hotel concierge) where to find the most photogenic subjects or spots, and keep your mind open to the following three criteria for the best travel photos:

- Convey the sense of place in your photos
- Offer a personalized point of view, not a postcard reproduction
- Ensure your images tell a coherent story as a set

Good luck and enjoy your trip!

For more articles and tips, visit www.nelsontan.com today!

Text and images are copyright property of Nelson Tan, and may not be reproduced in any form or format without prior written permission of the author. 
(C) Copyright 2011 Nelson Tan
All rights reserved.

Saturday, January 22, 2011

How quiet are Leica cameras?

0 comments
Photo credit: K. Praslowicz

Leica cameras have always been proclaimed as some of the quietest cameras around, making them suitable for street photography where stealth is preferred. Leaf shutter 35mm cameras can be quieter, but among focal plane shutter cameras I do love the Leica's cloth shutter with their "snick" sound instead of the metallic "clank" of other cameras.

If you hold a Leica in your hands for the first time without any other cameras for reference, you might wonder what's the fuss about, for the shutter is plainly audible as you click away. Test it against a couple of cameras, and you will realize why people don't hear you with a Leica.

Photographer K. Praslowicz recorded the clicks of several cameras at one location with similar shutter speed, to give you an idea of the relative loudness of each camera. Check out his article here!

http://www.kpraslowicz.com/2007/12/16/the-quiet-camera/